本案例为西门子PLC通过网关连接canopen伺服驱动器的配置案例,欢迎大家一起讨论
第一步:首先获取正确版本的 CANOpen Configuration Tools(CANOpen 配置工具),本案例使 用的版本为:

第二步:如果在本地电脑已经安装了低版本的 CANOpen Configuration Tools,请先卸载,卸载方法参照 开疆智能KJ-PNG-105 使用说明书,然后安装 CANOpen Configuration Tools,如果没有安装过 低版本的,请直接安装;
第三步:请参照 TECO 公司 JSDG2S 系列使用说明书和 开疆智能KJ-PNG-105 使用说明书,对 CAN 接口的 线序描述,正确制作 CAN 线缆;
第四步:请参照 JSDG2S 系列使用说明书设置伺服工作在 CANOpen 模式下,CN001 设置为 C:

第五步:参照 JSDG2S 系列使用说明书,设置 CN078(CANOpen 波特率)和 CN079(CANOpen 站地址),此处设置应与下文 CANOpen Configuration Tools 的配置相同;
第六步:打开 CANOpen Configuration Tools,按照 开疆智能KJ-PNG-105使用说明书,在【文件】菜单中
选择【导入 EDS 文件】,导入与实际伺服配套的 EDS 文件,本案例使用的版本为:

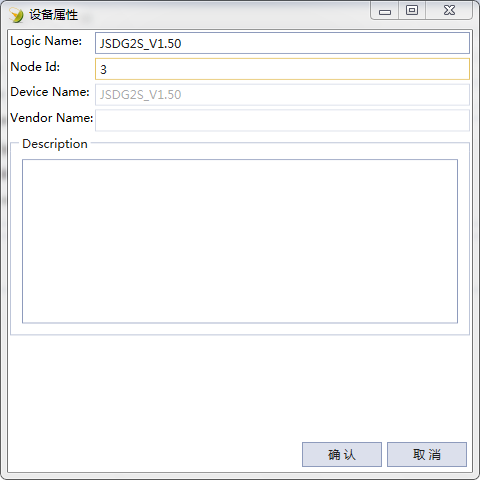
第七步:添加主站设备,开疆智能KJ-PNG-105,添加从站设备伺服,并设置从站的站地址为步骤五相同
的站地址,本案例设置为 3:
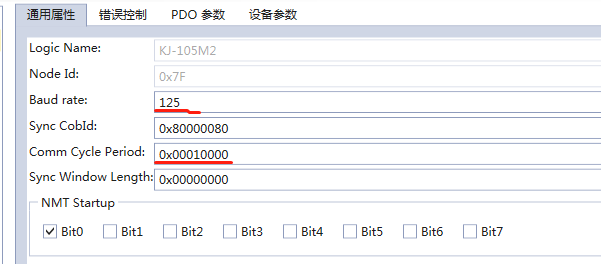
第八步:设置 CANOpen 主站参数,波特率设置和步骤五相同,如果 CANOpen 网络为同步模
式,设置同步周期(此处根据 canopen 规范单位为:ns),图中画红线的两个参数:
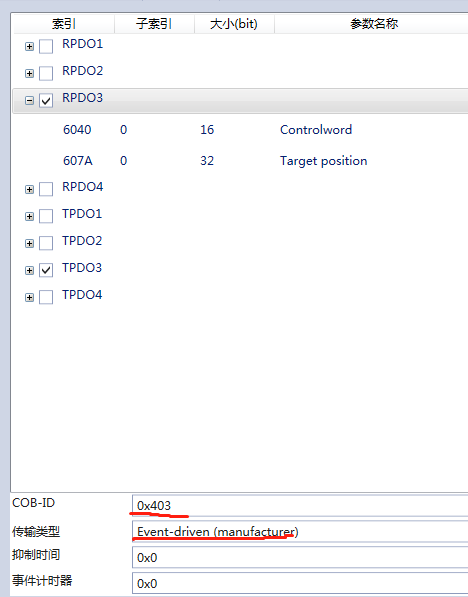
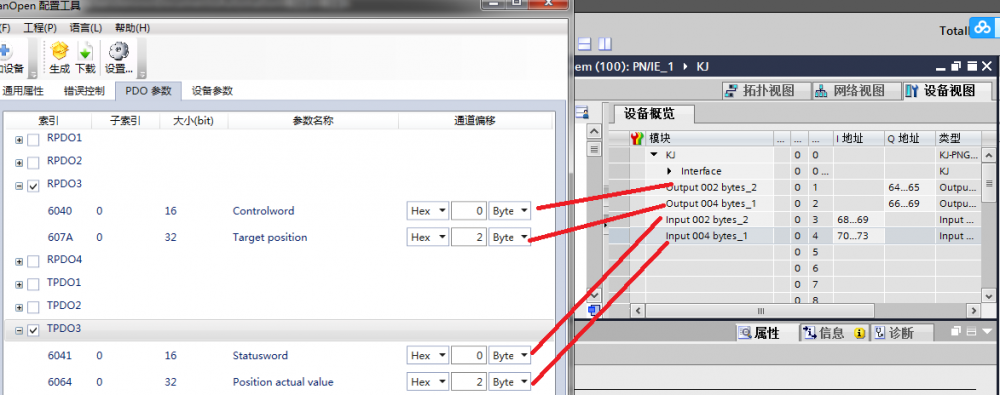
第九步:配置从站 PDO 参数,JSDG2S 的 EDS 文件默认 RPDO1 和 TPDO1 是有效的,可以根 据需要的运动模式进行勾选,本案例使用位置模式,所以选择 RPDO3 和 TPDO3,映射模式选择为 Byte,并设置各个对象在输入输出区映像的偏移:

第十步:设置 PDO 的通讯参数,主要是 COB-ID 和传输类型,此 EDS 文件的 RPDO3 的 COB-ID
默认为 0x400+&NodeID,因为站地址为 3,所以此处的 COB-ID 为 0x403,传输类型默认为事 件驱动,此处可以根据需要进行不同的选择,TPDO 的通讯参数设置方法类似,TPDO3 的
COB-ID 默认为 0x383+&NodeID,此处为 0x383:
第十一步:JSDG2S 伺服的设备参数设置,根据需求设置设备参数,这些设备参数的设置, 会通过后台的 SDO 发送给伺服从站,本案例使用位置模式,所以模式设置为 1(位置模式),这些参数的含义在 JSDG2S 的使用说明书都有描述,由于 JSDG2S 伺服的默认速度为 0,所以
速度也要设置一下,根据需要设置一个值:

第十二步:至此 CANOpen 参数设置就完成了,点击【生成】按钮,则生成下载文件,连接 好 开疆智能KJ-PNG-105 的 USB 下载线,在设置中选择正确的串口,进行下载,CANOpen 参数配置下载 完成; 第十三步:打开西门子博途软件,首先安装 开疆智能KJ-PNG-105 的设备描述文件 GSD 文件,如果博途 的版本较低比如 V13,请选择 V2.3 的 GSD 文件安装,如果博途的软件版本较高为 V14、V15,
请选择 V2.33 的 GSD 文件安装:
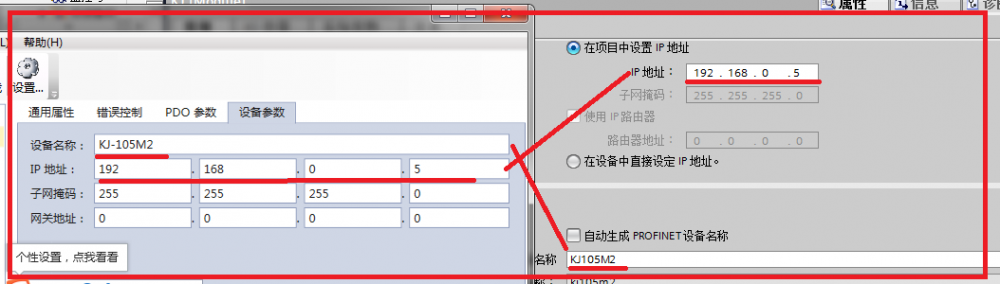
第十四步:根据在 CANOpen 的配置,在博途中配置 开疆智能KJ-PNG-105,CANOpen 配置中配置了两个 字节的控制字,对应博途的两字节输出,配置四个字节的目标位置,对应博途的四字节输出, 配置两字节的状态字,对应博途两个字节输入,配置四个字节位置反馈值,对应博途四个字
节输入,并确认配置软件的设备名和 IP 地址和博途配置一致,则配置完成,下载配置。
第十五步:以下步骤根据伺服的启动顺序修改控制字,先写控制字 06,状态字变为 31;
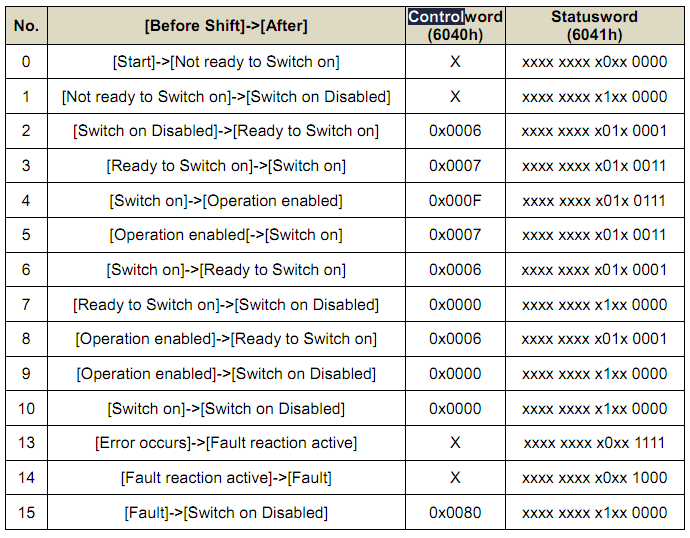

第十六步:写控制字 07,状态字变为 33;

第十七步:写控制字 0F,状态字变为 37,完成此步骤则电机抱闸,用手是转不动了;
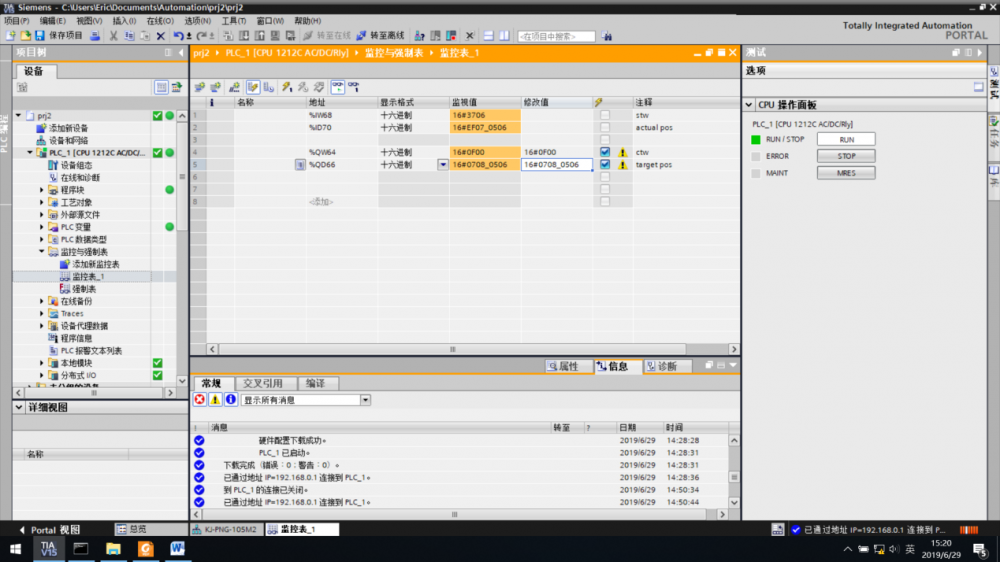
第十八步:写控制字 1F,写一个目标位置,更新数据,则电机开始转动;

[ 此帖被开疆智能在2019-08-24 20:52重新编辑 ]
 沪公网安备31010802001143号

